
One of the inspiring things about working at Moqups is the dedication of our core users. They don’t just like Moqups – they love it!
And that passion translates into a commitment to our product, and to its constant refinement. On a regular basis, we get their requests, suggestions, and demands.
Because our customers are often experienced UI/UX designers and developers, their suggestions are invariably on point and detailed – the kind of feedback that gets our attention and fast-tracks improvements.
So, today’s post is dedicated to you, and to new features developed specifically at your request.
Redesigned Image and Template Libraries
Users have rightly expected better asset management capability from these libraries. After all, if you can create and nest folders in your OS, it’s reasonable to expect that you could do so within Moqups too.
We heard you and, as a result, we’ve reimagined both libraries to make it easier to manage dozens – even hundreds – of assets.
It starts with the ability to create, organize, and nest folders. You’ll see the New Folder icon right in the library toolbar. And, in the More actions menu, or by right-clicking, you’ll find the following additional options: New folder with selection, Rename, and Delete.
Quickly creating a folder from a selection of assets is not the only new mass-functionality. You can also select multiple images or templates via Ctrl/Cmd or Shift and perform bulk operations – dragging and dropping onto a page, reorganizing whole groups of assets, or quickly deleting multiple files.
To see how content marketing agencies like Wisevu are using the new and improved Moqups templates and folders to scale their content writing and web design process, check out this article.
Next, in order to make it easier to find your images and templates, we’ve added the ability to toggle between Grid View and Tree View options.
For images, we’ve added a Download option so that you can download previously uploaded images and image-folders.
In addition to all these changes, we’ve introduced Team and Project categories to both the Image and Template libraries in order to give you and your team more workflow flexibility. A drop-down at the top of the panel lets you quickly choose between them.
The Team category allows you to upload and share commonly used assets – like logos and branded assets – with the rest of your team, and across all your projects. And, with the Project category, your team can streamline their workflow by assembling only those assets relevant to the project at hand.
Finally, we’ve changed the rules by which images are added to the library.
If you want an image added to the library, you can still use the Upload button, or simply drag and drop them directly onto the Image Panel itself – just as before. And from the library, you can add these images to the page by double-clicking or by drag-and-drop. No change here!
However, if you bypass the library step, by adding an image directly to a page from an external source (i.e. outside of the Image Library itself) – either by using copy-paste or drag-and-drop – that image will no longer be automatically added to your library.
We made this change because of a workflow our customers have adopted for brainstorming and competitor research. To create mood and idea boards, they quickly paste dozens of relevant screenshots onto a Moqups page. Once there, they can annotate and comment on the images to refine their ideas and build consensus.
However, the sheer volume of these ephemeral images can end up cluttering the ongoing Image Library. So, to avoid that problem, we’ve made it so that images that are copy-pasted or drag-and-dropped directly onto the page are not added automatically.
If, however, you want to add one of these temporary images to the permanent library, just right click on it, and select Add to library...
Copy & Paste Pages Between Projects
Users have long wanted the ability to share pages between projects – or break away selected pages for focused work, experimentation, and iteration.
In the past, the only way to transfer content from one project to another was to go page by page, select all the objects, and manually paste them into the new location. It was laborious, frustrating, and prone to all kinds of errors and omissions.
Now, it’s simple, quick, and foolproof:
- Select the pages and/or folders you wish to copy.
- Right-click and choose
Copy pagesfrom the Context Menu. - Select the browser tab of your destination project.
- Right-click on that project’s Pages Panel and choose
Paste pages. - To nest copied pages within an existing folder, click on that folder before you paste.
Within the same project, you can also use this feature to duplicate a whole section of the Page Tree, and paste it to a specific location within that project’s structure.
Touchpad Zoom
We know our users’ fingers were getting itchy, just waiting for this feature. After all, you inundated Support with requests. Making it happen was a genuine technical challenge, so we are thrilled to deliver it!
Now, you can Zoom in and out just by using two fingers on the touchpad (or Cmd/Ctrl + Mouse-Wheel). And zooming when using the keyboard or toolbar centers the zoom on an object when you have one selected.
This makes granular refinement and adjustment infinitely quicker and effortless.
Remove Background Color from Images & Improved Cropping
We’ve always designed Moqups so that you can stay within a single creative context for so many kinds of related work – charting, diagramming, wireframing, prototyping, and collaborating.
So when we heard that users were jumping out of Moqups because we lacked this specific image-editing capability, we resolved to do something about it.
Now, we’ve added this little bit of magic to our app so you can selectively remove any color from an image and make it transparent.
This is particularly useful during the creation of preliminary mockups, when you cobble together images, logos, and other kinds of visual references. Even though these elements are just temporary stand-ins for subsequent, more polished design elements, they still have to be slick and professional enough to be persuasive.
Inevitably that means cropping, stacking, adjusting, and grouping these assets to create a credible draft. You may need to quickly remove the background color from a logo, eliminate a distracting visual artifact, or see whether the product shots look better without their background. With Background Removal, all these tasks just got easier:
- Select an image to display the popover-toolbar for
Crop & Background Removal. - Enter Background Removal mode by clicking on the
Magic-Wandicon. - Click on the area of an image to remove a solid color, or click and drag to remove a color range.
- To apply the changes, click outside the image or click ‘Done’.
- ‘Reset’ returns the image to original.
- To save the altered image, right-click and select
Add to libraryoption from the Context Menu.
Since Background Removal meant rethinking the popover-toolbar for images, we took that opportunity to improve our Image Crop feature as well. We’ve added a zoom-slider so you can seamlessly zoom in, relocate the crop area, and apply your changes.
Enhanced Real-time Editing
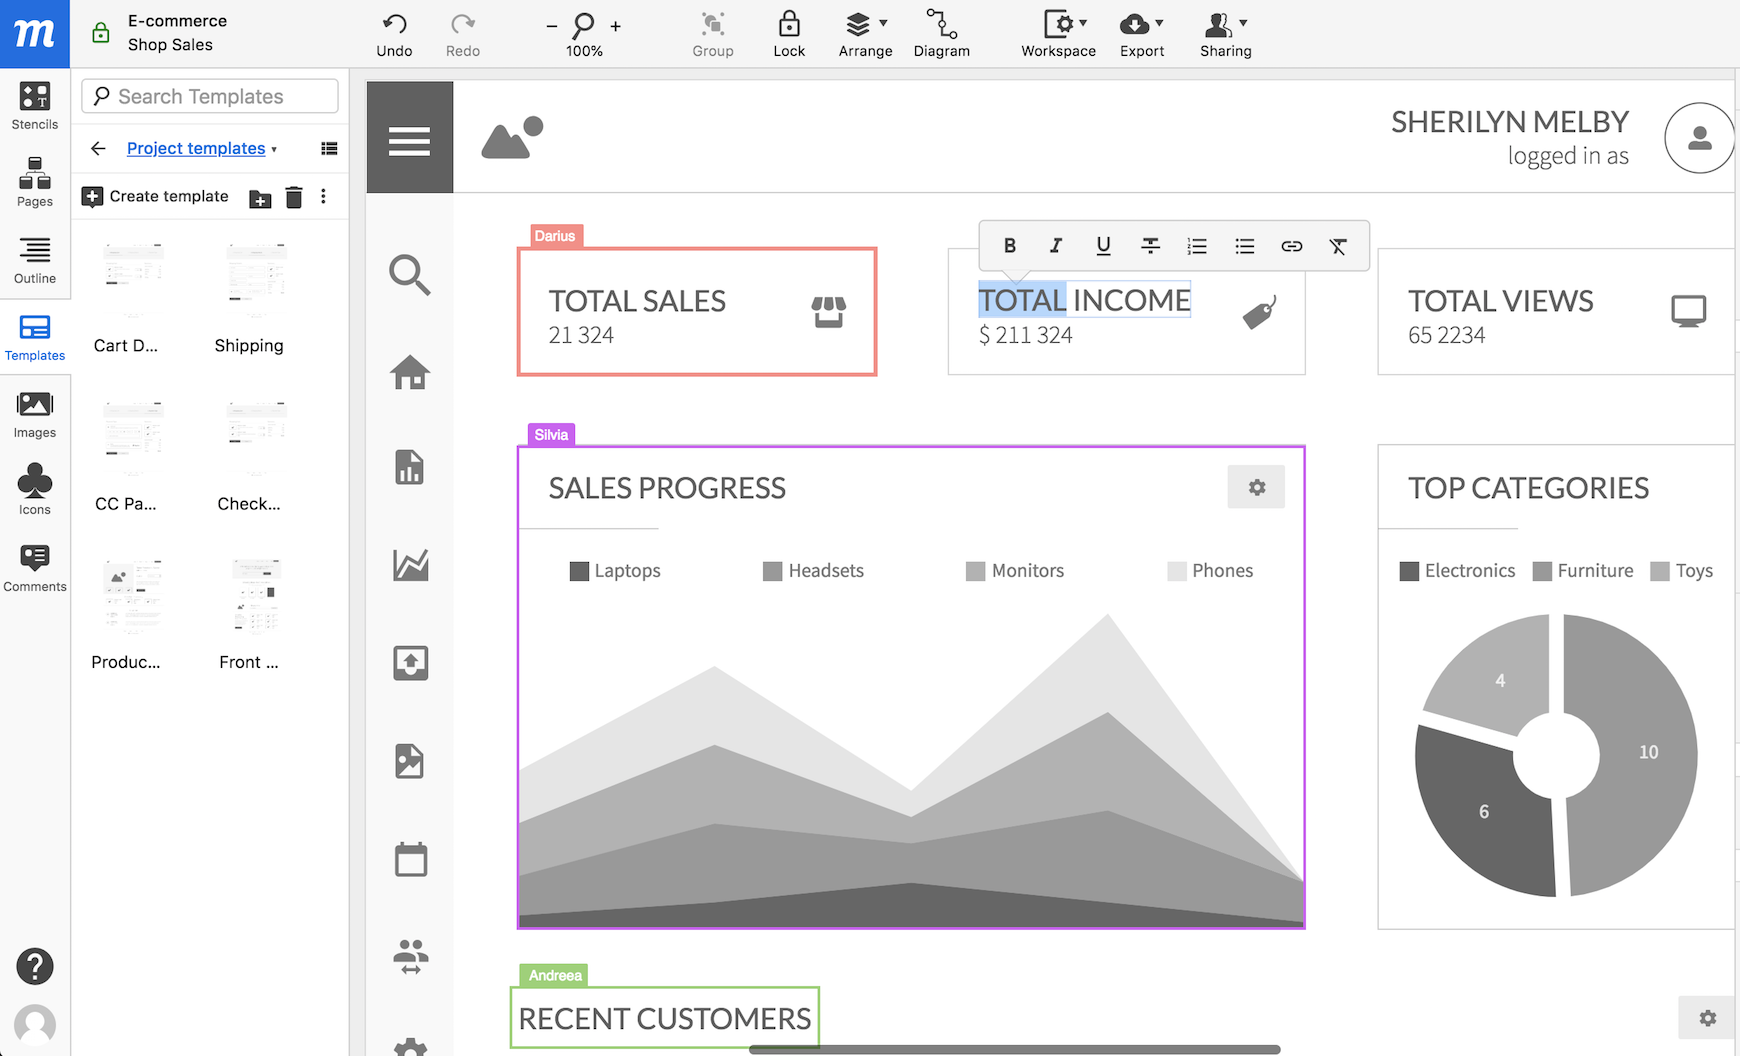
One consistent piece of feedback is that our users spend an increasing amount of time editing collaboratively and simultaneously – often from geographically dispersed locations.
And this has created a need for teams to see who’s currently at work on a project, jump to where specific colleagues are working, and identify who is making what changes, and in what order.
Our new Collaborator Presence answers those needs.
To show you who is working and where – and avoid overlap when editing in real time – a colored border with the collaborator’s name now appears around the objects they have selected.
And, in the Sharing window, hovering over a username provides a link to Go to Page or Go to Selection where the collaborator is currently at work.
Finally, to help the entire team with coordination, if multiple users select the same object, its presence border will display the last collaborator that selected it.
Thanks to all our users who took the time to write to us – and to explain their ideal workflow. All these changes are a consequence of your effort.
And to those users who have not yet written, please feel encouraged to write us at support@moqups.com – and let us know what changes would make your Moqups experience better!